Wednesday, January 26, 2011

Brioche french bread - so soft and moist!

A couple of years back, I really thought that one need a bread machine to make bread at home, but after trying to make it without one, I find that it is actually quite an effortless process especially when using a basic mixer with a dough hook.  Only thing is one needs to be really patient as there is lots of waiting time in between when the dough is being proof.  Since making bread for the first time last year, I have been making it at home quite often and really do enjoy the process.  I have been meaning to try making Brioche, which is a french bread for quite a while after bumping into this recipe in June 2010 issue of Australian Gourmet Traveller.  Finally I have a chance to try making it and OMG, it is the simplest bread to make as compared to my other bread making experiences.  It was a fairly quick process and the outcome was really good.  The bread has this really light feel and tasted so soft and moist even after a couple of days!  Anyways, recipe as per below, do give it a try. 

Brioche (adapted from June 2010 Australian Gourmet Traveller Magazine)
Ingredients:
(makes 1 loaf)
160ml milk
1 1/2tsp dried yeast
5 egg yolks at room temperature, lighly beaten
375gm plain flour, plus extra for dusting
30gm caster sugar plus extra for dusting
150gm butter, diced and softened, plus extra for greasing
Eggwash, for brushing

1) Warm milk in a small saucepan over low heat until lukewarm,  Combine yeast and half the milk in a bowl, stirring to dissolve.  Stand in a warm place until foamy (8-10 minutes)
2) Whisk remaining milk with egg yolks in a bowl and set aside
3) Mix flour, sugar and a pinch of salt in the bowl of an electric mixer, fitted with dough hook, until combined.  Make a well in the centre, add yeast mixture and yolk mixture.  Beat on medium speed until a smooth dough forms (4-5 minutes)
4) While mixing, gradually add one-third of butter at a time, beat until dough is elastic and pulls away from sides of bowl (8-10 minutes).
5) Transfer to a lightly buttered bowl, cover and stand until doubled in size (1 1/2-2 hours).
6) Knock back dough, knead on a lightly floured surface until smooth, shape into a loaf and place in a 11cm x 24cm loaf tin buttered and lined with baking paper.  Cover, stand until doubled in size (30 minutes-1 hour).  Meanwhile, preheat oven to 180C.)
7) Brush top with eggwash, dust with sugar, bake until golden and risen (25-30 minutes).
8) Remove from tin, place on a baking tray lined with baking paper, return to oven until sides are golden (8-10 minutes), cool on a wire rack.


Monday, January 17, 2011

Desserts Collection: Green Tea Ice-Cream with Green Tea Macaron "wafer"!

Seriously, when I was making this, am not sure I was going green-tea or ice-cream frenzy!  After working on Jan 2011 Daring Bakers Challenge (shhh...can't wait for 27th to reveal this!), I had lots of egg yolks remaining and wasn't quite sure how to use them all.  At the end, I decided to make ice-creams and at one go, I was making 3 different ice-cream flavours and one of them that I was meaning to try was green-tea.  I find the recipe I had used to make the black sesame ice-cream is so versatile, just need to substitute the ground black sesame with exact measurement of green tea - http://privatekitchenjourney.blogspot.com/2011/01/desserts-collection-black-sesame-ice.html

Also, I had meant to try making green-tea macarons and thought how about the macarons acting like an ice-cream wafer?!  Hence, I ended up drawing 4 circles, slightly bigger than an ice-cream scooper and also ended up with quite a bit of macaron batter which I pipe them into the normal macaron size circles.  Next came the decision as to what filling to make and I ended up making a green tea butter-cream with the remaining egg yolks.   When I was done with all that and started plating up and tasting them, OMG, I must be in green tea heaven!!!  Anyways, for big fans of green tea or one with an adventurous taste bud, below are the recipes for you to try - enjoy!!!

Green Tea Macarons
(Yield 4 pikelet size macarons and 18-20 pairs of normal size macarons)
Ingredients:
125g ground almonds
125g icing sugar
100g caster sugar
100g egg whites at room temperature
25g icing sugar
5g green tea powder
a pinch of cream of tartar

Method:
1) In a food processor, whiz the ground almonds and 125g of icing sugar until fine, about 5 minutes.  Using a sifter, sieve it into a separate bowl.
2) Add cream of tartare and egg whites into a mixer and whipped until foamy.  Slowly add caster sugar in 2-3 batches and continue whipping until just at firm stage.
3) Add the icing sugar and ground almonds mixture in 3 batches to the whipped egg whites and using a silicon spatula, stir until just incorporated.
4) Sieve the remaining icing sugar and green tea powder into 3) and stir until just incorporated.
5) Using either a silicon spatula or a scrapper, knead the dough until smooth and shiny, around 40 - 50 times. 
6) Pour dough into piping bag and pipe onto a non-stick baking paper (or silicon mat) placed on a baking sheet into the size desire.  (NOTE: Would be helpful to draw circles on the non-stick baking paper before starting so that u have consistent size of macarons.).  If the pipe out dough does not have a smooth top, tap sheet on the bench a couple times to smooth out the dough.  Let stand for about 30 minutes or until the top is dry (when you touch the top, it does not stick to your fingers).
7) Bake in 150C fan force pre-heated oven for about 20 minutes (for normal size macarons) or 30 minutes for pikelet size macarons. (NOTE:  Before pre-heating the oven, put a baking sheet in the oven rack as it needs to be double stack, meaning the baking sheet with the pipe macarons will go on top of another baking sheet which has been in the oven while it is being preheated.)


Green Tea Butter-Cream
Ingredients:
50ml milk
1 tsp green tea powder or more if you like a stronger green-tea taste
60gm soften butter
1/4 cup caster sugar
2 egg yolks

Method:
1) Heat milk in small saucepan until it boils slightly.  Remove from heat, pour green tea powder into the milk and cover with lid for about 8-10 minutes
2) In another bowl, whisk egg yolks with caster sugar until whitish in colour.  While whisking, pour milk and green tea into the egg yolk mixture.  Continue whisking until incorporated.
3) Pour yolks and milk mixture back to saucepan and on medium low heat, whisk the mixture continuously until thick and creamy.  Remove from heat.  Pour mixture into a mixer.  At this stage, the mixer bowl will feel very hot. 
4) Whip the mixture until it is at room temperature. (To gauge that, feel the side of the mixing bowl.  If it feels cool, the mixture is at room temperature). 
5) At this stage, add the butter in 3-4 additions and continue whipping until mixture is smooth and has a thick consistency.  Use a spoon and stir mixture until incorporated.  Place in piping bag and pipe into cool macarons.  (note:  Filled macarons can be stored in an airtight container and freeze or refrigerated.  It can be stored from 2-4 weeks in the freezer (if it last that long not eaten up!) or 5 days in the fridge.)

Saturday, January 15, 2011

Dong Po Pork (Whole Braise Pork Belly)

I am not sure the real reason but in 2010 I think I have done more food experiments than I have ever before. I have also bought so many recipe books in 2010 that I have lost track of how many I have bought.  Could be influences from watching Masterchef Australia or could just be not needing to work much on weekends anymore, hence more time to indulge in my passion in my favourite spot at home (my kitchen of course!).  As I have bought so many recipe books last year and also receive a couple as X mas presents, I am sometimes in a dilemma as to what to experiment as there is just too many choices but not enough time. I guess the wisest choice is always to look at my fridge or kitchen pantry to see what I have got and see if there is something special I can try out from the recipe books.

I had a nice piece of pork belly that I bought which has been sitting in my freezer for a couple of weeks.  I initially bought that to make roast pork but decided to try making "dong po" pork instead when I came across the recipe in "Poh's Kitchen" recipe book.  The outcome was quite good although I could have braised it longer so that the skin is more tender.  I modified the recipe slightly as when I was about to start, I realize that I forgot to get some of the ingredients hence substituted a couple of items with what I have got at home - again trying to achieve my goal of being resourceful..lol.

For those unfamiliar with "dong po"pork, it is actually braise pork belly but instead of cutting them up in pieces to be braised, it is braised as a chunk and then sliced up after the process has been completed.  Anyways, recipe as per below...enjoy:)

Dong Po Pork (adapted from "Poh's Kitchen my cooking adventures" by Poh Ling Yeow's recipe book, modified slightly) - serves 5-6 as part of a shared meal
Ingredients:
1 kg pork belly
3 tbs vegetable oil
4 spring onions, sliced (I substituted this with a bunch of coriander roughly chopped)
10 slices ginger, each about 4mm thick (I substituted this with about 1 tbs of chinese five spice powder)
125g yellow rock sugar
3 1/2 tbs dark soy sauce
3 1/2 tbs light soy sauce
150ml shaoxing rice wine
1/2 cup water

Method:
1) To prepare the pork belly, score the skin with 5mm parallel slits, then repeat in a perpendicular direction to create a lattice effect. 
2) Heat the oil in a wok over medium heat.  First place the pork with skin side down, to render some of the fat and crisp it up (this takes about 5 minutes) before browning all sides. (note: be careful as there can be some splattering of oil due to moisture coming out from the meat).  Set aside when all sides have been sealed (takes about 4-5 minutes each side) and have developed some good colour.
3) Combine spring onion (or coriander if using as substitute), ginger (or chinese five spice), sugar, both soy sauces, wine and water in a wok (or heavy based non-stick saucepan) over medium heat until the sugar dissolves.  Lower the pork into the wok and simmer for 2-2 1/2 hours (turning the meat a few times during the cooking process), or until the meat is very tender.  If necessary, add 1-2 tbs of water to prevent the sauce from burning and sticking to the bottom.  The sauce should be a sticky glaze. 
4) Rest for 15 minutes.  Cut the pork into long thin slices, like bacon, and serve as a sharing dish with rice and some steamed Asian greens.

Friday, January 14, 2011

Desserts Collection: Black Sesame Ice-Cream (ice-cream machine not needed!)

I love black sesame (but I think my younger sis loves it way more!) and recently bought a big packet of ground black sesame from an Asian grocery store in Melbourne and have been trying to use them any chance I get in my food experiments.  Tried making black sesame french macarons with it and it tasted good (recipe to come in future postings!).  Came across an ice-cream recipe in last Tuesday "The Sydney Morning Herald" newspaper but it was a green tea ice-cream recipe.  Looked at it and seem simple hence instead of green tea, I thought I will substitute it with Black Sesame instead.  The recipe had indicated freezing in an ice-cream machine but unfortunately I do not have one BUT I must say without using an ice-cream machine, it still turn out fine and I made it all with no hassle at all. 

For those unfamiliar with black sesame, it is like white sesame but its black in colour.  It has a fragrant very similar to roasted peanuts.  Anyways, recipe as below.

Black Sesame Ice-Cream (Ice-Cream machine not necessary)
(makes about 5-6 scoops of ice-cream)
1 heap tbsp ground black sesame plus a little extra for sprinkling
1/2 cup sugar
3 egg yolks
3/4 cup milk
200ml whipping or pouring cream

Method:
1) Mix ground black sesame with 2 tbs sugar.
2) In a separate bowl, whisk egg yolks with remaining sugar until white and creamy, set aside.
3) Place milk in a medium saucepan on medium low heat until it is about to boil but not to boiling stage.
4) Remove from heat and pour some milk into the ground black sesame.  Stir until incorporate and then pour the black sesame mixture back to the saucepan with the remaining milk. 
4) While stirring the egg yolk and sugar mixture, pour a little of the milk (that now contain the sesame mixture as well) into the mixture and continue to stir.  Pour the remaining milk into the mixture and stir until incorporate and without lumps.
5) Pour the egg, milk and sesame mixture back into the saucepan and on medium heat, using a whisk, stir mixture until thick and creamy, remove from heat and let cool quickly (tip: to get it to cool quickly is to either fill a bowl with ice and place the saucepan on it OR place the saucepan on a couple of freeze ice packs with a cloth over it (refer to attached picture below).  Set aside.
6) In a mixer, whip the pouring cream until it is thick with a slight lumpy texture.
7) Mix the whipped cream and cool egg and black sesame mixture together.  Stir until smooth and without lumps. 
8) Place it in a stainless steel container.  Cover the top with a tin foil paper or plastic wrap and freeze for 3 hours.
9) Remove from freezer, give the mixture a thorough stir (it would be unevenly hard at this stage) and place it back covered in the freezer to freeze overnight (or approximately 7-8 hours). 
10) Serve it with a sprinkle of ground black sesame.  Enjoy!
(note:  It was very hard to scoop out when I removed from the freezer, hence depending on the room temperature, best to let it sit on the bench for about 10 minutes before scooping it out)


Sunday, January 2, 2011

Rice paper rolls with free and easy filling serve with soy, mirin and coriander sauce

I think rice paper sheets is a must have item in a kitchen pantry as it is so versatile and can be filled with almost any fillings.  Also, it is quick and easy to prepare and can be serve as an entree item or a meal if one is in a hurry or feel lazy to cook up a storm just like how I feel tonight..lol.

Rice paper rolls is a typical entree item in most Vietnamese restaurant.  It is shape like a spring roll however rice paper rolls skin is soft and translucent and not deep fried.  The most common fillings used are prawn, vermicelli and lettuce.

Fillings that I decided to use is none of the above.  Again, am trying to be resourceful and used whatever that is in my pantry.  At the end, I opted for mixed salad greens, chicken tenderloin strips, enoki mushrooms, raisins and chopped hazelnuts.  As for the sauce (note: dipping sauce is important with rice paper rolls as without it, it is basically tasteless!), I came up with this idea of combining soy, mirin and coriander which was not too bad.  Anyways, recipe as per below - enjoy trying!

Ingredients:
(makes 8 rice paper rolls)
8 rice paper sheets - can be bought from Asian grocery stores or the Asian section of major supermarkets, usually comes in a packet with more than 20 sheets in a packet.
2 chicken tenderloin strips
A handful of mixed salad greens, roughly chopped
A handful of raisins
A handful of roasted hazelnuts, roughly chopped
A handful of enoki mushroom
1 stalk of Coriander, chopped to small pieces
4tbs of light soy sauce
1tbs of mirin
A pot of boiling water - to soak and soften the rice paper sheets

Method:
1) In a small bowl, combine coriander, soy sauce and mirin.  Set aside to allow the coriander to infuse in the sauce.
2) In a small pot of boiling water, cook the chicken tenderloins for 5 minutes.  Drain and soak in room temperature water for 5 minutes.  Cut or tear into small strips and place in bowl.
3) In a small pot of boiling water, cook the enoki mushroom for 5 minutes.  Drain in a sieve and rinse with room temperature water.  Squeeze access water and place in bowl.
4) In a baking sheet (deep and wide enough to hold 1/2 - 1 cup of water and rice paper sheet) - place 1 rice paper sheet (you have to do this process 1 at a time or the sheets will stick to one another) on the baking sheet, pour about 1/2 cup of boiling water on to the sheet (ensure enough to cover the sheet).  Wait for 1 minute for the sheet to soften.  Remove from water and place sheet on to a plate.  At this stage you can start assembling.
5) To assemble the roll, place 1/8 quantity of salad greens, chicken strips, enoki mushrooms, raisins and chopped nuts in the middle of soften rice paper sheets and wrap them up as you would a spring roll.  Repeat step 4-5 for the remaining sheets.  Serve with dipping sauce.

Saturday, January 1, 2011

Malaysian Style Egg Tarts "my way" - sweet start to the New Year!

Happy New Year 2011!  Wish all readers a healthy, and happy new year.  Hope all your goals, dreams and resolutions come true!  One of my many resolutions this year is to be resourceful in terms of food.  I think I have a bad habit of buying too much of food and not being able to finish them before the expiration date.  With the 3 days new year break, I decided not to step into the supermarket but instead try to cook stuff up with whatever that I have got at home.  To kick start with this tiny step challenge, I decided to try making Malaysian style egg tarts "my way" with the remaining store bought frozen puff pastry I have in my freezer and eggs that I have got in the fridge.  I have been meaning to try this combination for a while but for whatever reason, have not gotten around to trying them until now.  I have tried making eggs tarts from scratch but somehow can't quite achieve the desire results especially the pastry bit. 

For those not familiar with Malaysian style egg tarts, it is basically egg custard with a puff pastry base.  It is a popular "ÿum cha" item in Chinese Restaurants and also a common Asian take away breakfast item.  As it is sweet, it is most often serve with Chinese tea or green tea at the side to wash it down.  Anyways, recipe as per below, enjoy. 

Malaysian Style Egg Tarts "my way"
(yield 4 medium size tarts)
Ingredients:
1 sheet of frozen puff pastry
1 eggs
1.5 tbs caster sugar
60ml warm water
1/4 tsp vanilla essence
2 drops yellow coloring, optional

Method:
1) Preheat oven to 180C.
2) Grease 4 6cm diameter removable base tart moulds.  Leave aside for use later
3) Bring out the puff pastry from freezer and let it sit at room temperature for about 5-10 minutes
4) In a bowl, whisk the egg with caster sugar until light in color and creamy.
5) Pour the water into the egg/sugar mixture and stir till incorporate.  Add vanilla essence and yellow coloring if using.  Stir and incorporate.  Using a sieve, sieve mixture to another bowl.  Leave aside for use later
6) Cut 4 rounds from puff pastry sheet that can fit nicely into tart moulds. 
7) Fit rounds into tart moulds.
8) Pour the sieved egg mixture into the moulds until almost to the top (but not quite the top yet).
9) Place the moulds onto a baking tray and bake in the oven for about 20 minutes or until set.  Serve warm with tea at the side.  Enjoy:)


Monday, December 27, 2010

Daring Bakers Challenge Dec 2010: Christmas Stollen


The 2010 December Daring Bakers’ challenge was hosted by Penny of Sweet Sadie’s Baking. She chose to challenge Daring Bakers’ to make Stollen. She adapted a friend’s family recipe and combined it with information from friends, techniques from Peter Reinhart’s book.........and Martha Stewart’s demonstration.
December has been a very busy month for me, both at work and at home.  Hence, attempting new kitchen experiments has been a challenge, however, I did not want to miss this challenge as it looked interesting and it was something I had not attempted before.  Tried to squeeze in  time before going on  Christmas vacation to attempt this and I must say, I have no regrets.  It was such an enjoyable experience.  Although the recipe seem lengthy, the whole process is fairly easy.  When I first looked at the amount of servings for the full recipe, I decided to go for half a recipe and that was a big mistake!  Reason being the aroma of the stollen right out of the oven makes one wants to dive into it straight away:)  It not only smells great, it taste really good as well.  Be warned upfront, it is very addictive, after one serving, one wanna go for more:)  Anyways, recipe as per below - enjoy!


Stollen Wreath
Makes one large wreath or two traditional shaped Stollen loaves. Serves 10-12 people
Ingredients
¼ cup (60ml) lukewarm water (110º F / 43º C)
2 packages (4 1/2 teaspoons) (22 ml) (14 grams) (1/2 oz) active dry yeast
1 cup (240 ml) milk
10 tablespoons (150 ml) (140 grams) unsalted butter (can use salted butter)
5½ cups (1320 ml) (27 ozs) (770 grams) all-purpose (plain) flour (Measure flour first - then sift- plus extra for dusting)
½ cup (120 ml) (115 gms) sugar
¾ teaspoon (3 ¾ ml) (4 ½ grams) salt (if using salted butter there is no need to alter this salt measurement)
1 teaspoon (5 ml) (6 grams) cinnamon
3 large eggs, lightly beaten
Grated zest of 1 lemon and 1 orange
2 teaspoons (10 ml) (very good) vanilla extract
1 teaspoon (5 ml) lemon extract or orange extract
¾ cup (180 ml) (4 ¾ ozs) (135 grams) mixed peel (link below to make your own)
1 cup (240 ml) (6 ozs) (170 gms) firmly packed raisins
3 tablespoons (45ml) rum
12 red glacé cherries (roughly chopped) for the color and the taste. (optional)
1 cup (240 ml) (3 ½ ozs) (100 grams) flaked almonds
Melted unsalted butter for coating the wreath
Confectioners’ (icing) (powdered) sugar for dusting wreath

Note: If you don’t want to use alcohol, double the lemon or orange extract or you could use the juice from the zested orange.

Directions:
Soak the raisins
In a small bowl, soak the raisins in the rum (or in the orange juice from the zested orange) and set aside. See Note under raisins.

To make the dough
1 Pour ¼ cup (60 ml) warm water into a small bowl, sprinkle with yeast and let stand 5 minutes. Stir to dissolve yeast completely.
2 In a small saucepan, combine 1 cup (240 ml) milk and 10 tablespoons (150 ml) butter over medium - low heat until butter is melted. Let stand until lukewarm, about 5 minutes.
3 Lightly beat eggs in a small bowl and add lemon and vanilla extracts.
4 In a large mixing bowl (4 qt) (4 liters) (or in the bowl of an electric mixer with paddle attachment), stir together the flour, sugar, salt, cinnamon, orange and lemon zests.
5 Then stir in (or mix on low speed with the paddle attachment) the yeast/water mixture, eggs and the lukewarm milk/butter mixture. This should take about 2 minutes. It should be a soft, but not sticky ball. When the dough comes together, cover the bowl with either plastic or a tea cloth and let rest for 10 minutes.
6 Add in the mixed peel, soaked fruit and almonds and mix with your hands or on low speed to incorporate. Here is where you can add the cherries if you would like. Be delicate with the cherries or all your dough will turn red!
7 Sprinkle flour on the counter, transfer the dough to the counter, and begin kneading (or mixing with the dough hook) to distribute the fruit evenly, adding additional flour if needed. The dough should be soft and satiny, tacky but not sticky. Knead for approximately 8 minutes (6 minutes by machine). The full six minutes of kneading is needed to distribute the dried fruit and other ingredients and to make the dough have a reasonable bread-dough consistency. You can tell when the dough is kneaded enough – a few raisins will start to fall off the dough onto the counter because at the beginning of the kneading process the dough is very sticky and the raisins will be held into the dough but when the dough is done it is tacky which isn't enough to bind the outside raisins onto the dough ball.
8 Lightly oil a large bowl and transfer the dough to the bowl, rolling around to coat it with the oil. Cover the bowl with plastic wrap.
9 Put it in the fridge overnight. The dough becomes very firm in the fridge (since the butter goes firm) but it does rise slowly… the raw dough can be kept in the refrigerator up to a week and then baked on the day you want.

Shaping the Dough and Baking the Wreath
1 Let the dough rest for 2 hours after taking out of the fridge in order to warm slightly.
2 Line a sheet pan with parchment paper.
3 Preheat oven to moderate 350°F/180°C/gas mark 4 with the oven rack on the middle shelf.
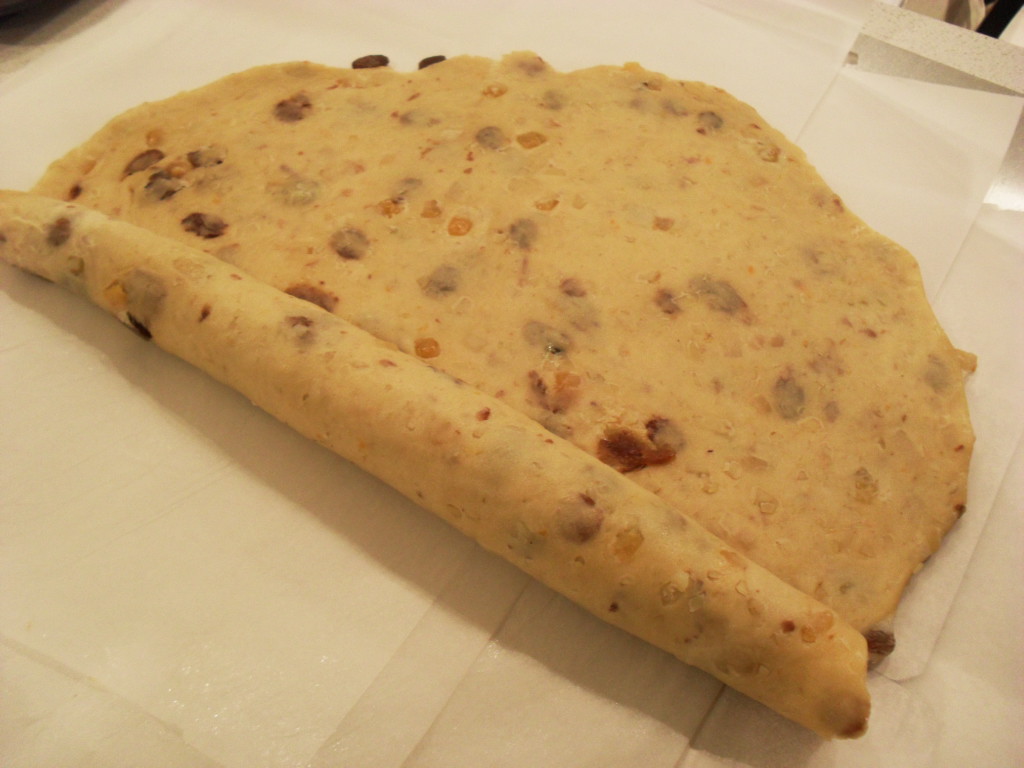
4 Punch dough down, roll into a rectangle about 16 x 24 inches (40 x 61 cms) and ¼ inch (6 mm) thick.
5 Starting with a long side, roll up tightly, forming a long, thin cylinder.
6 Transfer the cylinder roll to the sheet pan. Join the ends together, trying to overlap the layers to make the seam stronger and pinch with your fingers to make it stick, forming a large circle. You can form it around a bowl to keep the shape.
7 Using kitchen scissors, make cuts along outside of circle, in 2-inch (5 cm) intervals, cutting 2/3 of the way through the dough.
8 Twist each segment outward, forming a wreath shape. Mist the dough with spray oil and cover loosely with plastic wrap.
9 Proof for approximately 2 hours at room temperature, or until about 1½ times its original size.
10 Bake the stollen for 20 minutes, then rotate the pan 180 degrees for even baking and continue to bake for 20 to 30 minutes. The bread will bake to a dark mahogany color, should register 190°F/88°C in the center of the loaf, and should sound hollow when thumped on the bottom.
11 Transfer to a cooling rack and brush the top with melted butter while still hot.
12 Immediately tap a layer of powdered sugar over the top through a sieve or sifter.
13 Wait for 1 minute, then tap another layer over the first.
The bread should be coated generously with the powdered sugar.
14 Let cool at least an hour before serving. Coat the stollen in butter and icing sugar three times, since this many coatings helps keeps the stollen fresh - especially if you intend on sending it in the mail as Christmas presents!
15 When completely cool, store in a plastic bag. Or leave it out uncovered overnight to dry out slightly, German style.
The stollen tastes even better in a couple of days and it toasts superbly…. so delicious with butter and a cup of tea….mmmmm

Storage
The more rum and the more coatings of butter and sugar you use the longer it will store.
The following is for the recipe as written and uses the 45 mls of rum and two coatings of butter and icing sugar
1. Stollen freezes beautifully about 4 months
2. The baked stollen stores well for 2 weeks covered in foil and plastic wrap on the counter at room temperature and
3. One month in the refrigerator well covered with foil and plastic wrap.