Have been meaning to try this recipe for a while as the picture looks really good in the magazine. However, I tend to shy away from recipes that calls for short crust pastry as it tends to get messy and I never seem to get the results that I want. I could cheat and buy ready made frozen short crust pastry but I guess the outcome will not taste as good or rather there would not be as great of a satisfaction as if it was made from scratch. Decided to give this a go, worst case it just ends up in the bin...lol...
This time I decided to start the short crust pastry in my tiny food processor instead of by hand. Its definitely less messier and way quicker. The hard part I find is when it has been chilled ready to be rolled and lined in the tart pan. After rolling, it is so fragile, it just tends to split before I could even get it into the tart pan. I had to change the way it was done, instead of rolling, I placed the dough into the tart pan and slowly shaped them to fit the pan. The results was definitely better:)
Also, the tart does taste as good as it looks in the magazine. The lime zest gives it a nice aroma and just makes one really hungry and wanna dive into the tart! Its definitely worth the time and effort in trying them out. Recipe as per below - enjoy!
Chilli crab and prawn tarts
(Adapted from Delicious Magazine - March 2010 issue, modified slightly)
Makes 6
Ingredients:
For shortcrust pastry:
250g plain flour
125g chilled butter, chopped
1 egg yolk
Chilli Crab and Prawn:
20g unsalted butter
4 eschalots, thinly sliced
1 tablespoon chilli powder
12 green prawns, peeled, chopped
140g cooked crab meat
1/2 cup pure thin cream
3 egg yolks
2 tbs chopped coriander
grated zest of 1 lime
Method:
Short Crust pastry
Place flour and butter in food processor and process until mixture resembles fine bread crumbs. Add egg yolk and 2 tbs chilled water and process until mixture comes together in a smooth ball. Divide into 6 portions, shape into a disc, then enclose in plastic wrap and chill for 30 minutes before using.
Preheat oven to 180C. Lightly grease six 10cm tart pans. Place each of the chilled dough into the pan and press to fit bottom and sides of pan. Prick bases with fork. Chill for 10 minutes.
Line pastry cases with baking paper and fill with pastry weights or uncooked rice. Bake for 10 minutes, remove paper and weights and bake for a further 5 minutes or until light golden and crisp.
Chilli Crab and Prawn
Melt the butter in a non-stick frypan over medium low heat. Cook the eschalot and chilli powder, stirring for 2-3 minutes until softened. Transfer to a bowl and set aside.
In the same pan on high heat, cook the prawns, turning for 2-3 minutes until pink and just cooked. Off the heat. Add the eschalot mixture and crab meat to the prawns, season with salt and pepper, stir to combine, and set aside.
Whisk the cream, egg yolks, coriander and zest in a jug or tall mug. Season with salt and pepper.
Spoon the prawn and crab mixture into the tart shells, then pour the egg mixture over the top. Bake for 20-25 minutes until set. Stand for 10 minutes before serving.
Saturday, November 6, 2010
Chilli Crab and Prawn Tart - Part 1 of a Tart Weekend?!
Tuesday, November 2, 2010
Desserts Collection: Triple chocolate ricotta cheesecake - Say Cheezee!
Once upon a time, I used to buy quite a number of women's magazines on a monthly basis. Whatever that is on the shelve, you name it I have got it! For whatever reason, this habit change and I notice myself buying more food magazines and come to a point now, I only buy food magazines and my favourite being Delicious, followed by Masterchef Australia and Gourmet Traveller. Looking at the glossy and appetizing food pictures is always inspiring and often makes me wanna try each and everyone of them. However, finding time is always a challenge. In the October 2010 issue of Australia Gourmet Traveller's magazine, there is a section on Cheesecakes and OMG, the pictures looks awesome and appears delicious. I think I had looked at it many times throughout the course of the month, but could not squeeze in the time to give it a try. However, a good friend in town visiting for the week changed that as this friend had a birthday coming up the same week and that was really a good excuse to make a cake:) Of the so many recipes in there, I decided to try the Triple chocolate ricotta cheesecake as it seem interesting and I have not had much experience with using ricotta cheese.
When I first read the recipe, it did not appear to be complicating but as I started on the process of making it, things did not go as smooth as I had wanted it to. I had to take the risk of changing the process along the way and each time I prayed hard that the cake will turn out OK. However, when I came to the last step which is the top layer, I did not continue as I was not comfortable with the mixture and am scare it will ruin the existing layers of the cake. So instead, I decided to make chocolate ganache and pipe them on to the cake. Still look presentable on the overall and it did turn out OK (thank god!). It tasted quite good as well. Looked rich but with a lighter taste than cheesecake made with cream cheese. Warning though - unless you have more than 4 hours to spare on a week night after work, reserve to attempt this on a weekend. Anyways, recipe as below - enjoy!
Triple chocolate ricotta cheesecake
(Adapted from Oct 2010 issue of Australia Gourmet Traveller magazine - modified slightly)
Prep time 30 mins, cook 50 mins (plus cooling, setting)
Serves 10-12
Ingredients:
Oil for greasing
50gm hazelnuts, coarsely chopped
140gm caster sugar
150gm dark chocolate (65% cocoa solids), finely chopped
150ml pouring cream
2 egg yolks
Dutch-process cocoa, for dusting
Chocolate sable pastry
60gm caster sugar
60gm sour cream
100gm softened butter
90gm plain flour, sieved
30gm Dutch-process cocoa, sieved
White Chocolate ricotta filling
240gm couverture white chocolate, finely chopped
600gm firm ricotta
Dark Chocolate ricotta filling
240gm dark chocolate (65% cocoa solids), finely chopped
600gm firm ricotta
20gm pure icing sugar, sieved
Method:
1) For chocolate sable pastry, preheat oven to 180C. Beat sugar, sour cream and 60gm butter in an electric mixer until very pale (2-3 minutes). Add flour and cocoa, stir to combine. Roll out pastry between two pieces of baking paper to a 20cm X 25cm rectangle. Place on an oven tray, bake until crisp (25-30 minutes), then cool. Break into coarse pieces, process in a food processor to fine crumbs. Melt remaining butter, add to food processor, process to combine. Press into a base of a 6cm deep, 22cm diameter ring mould placed on a tray lined with baking paper. Bake until firm (8-10 minutes), cool.
2) For white chocolate ricotta filling, place all ingredients in a heat proof bowl over a saucepan of simmering water. Stir until chocolate melts. Let cool to room temperature and spoon over crumb base, smooth top and refrigerate until firm (30 minutes).
3) For dark chocolate ricotta filling, observe same steps as white chocolate ricotta filling. Once mixture cools to room temperature, spoon them over the white chocolate filling. Smooth top and refrigerate until firm (30 minutes). Best kept overnight.
4) Meanwhile, place hazelnuts on an oiled oven tray. Combine sugar and 60ml water in a saucepan, stir over medium-high heat until sugar dissolves, cook until dark caramel (5-7 minutes). Pour caramel over hazelnuts, stand until set, break into coarse pieces and store in an airtight container until required.
5) Combine dark chocolate and cream in a heatproof bowl over a saucepan of simmering water, stir occasionally until smooth (3-4 minutes). Whisk yolks and 30ml water in a heatproof bowl over a saucepan of simmering water until light and fluffy (2-3 minutes), fold in chocolate mixture, transfer to an electric mixer, whisk until thick and cooled to room temperature (6-8 minutes). Spoon over cake, refrigerate until set (2-3 hours). Scatter with praline hazelnuts, dust with cocoa and serve.
(note: as mentioned earlier on, I discarded this step and instead pipe chocolate ganache on the set layer of the dark chocolate ricotta filling. If u happen to give this step a try, would like to know your outcome!)
When I first read the recipe, it did not appear to be complicating but as I started on the process of making it, things did not go as smooth as I had wanted it to. I had to take the risk of changing the process along the way and each time I prayed hard that the cake will turn out OK. However, when I came to the last step which is the top layer, I did not continue as I was not comfortable with the mixture and am scare it will ruin the existing layers of the cake. So instead, I decided to make chocolate ganache and pipe them on to the cake. Still look presentable on the overall and it did turn out OK (thank god!). It tasted quite good as well. Looked rich but with a lighter taste than cheesecake made with cream cheese. Warning though - unless you have more than 4 hours to spare on a week night after work, reserve to attempt this on a weekend. Anyways, recipe as below - enjoy!
Triple chocolate ricotta cheesecake
(Adapted from Oct 2010 issue of Australia Gourmet Traveller magazine - modified slightly)
Prep time 30 mins, cook 50 mins (plus cooling, setting)
Serves 10-12
Ingredients:
Oil for greasing
50gm hazelnuts, coarsely chopped
140gm caster sugar
150gm dark chocolate (65% cocoa solids), finely chopped
150ml pouring cream
2 egg yolks
Dutch-process cocoa, for dusting
Chocolate sable pastry
60gm caster sugar
60gm sour cream
100gm softened butter
90gm plain flour, sieved
30gm Dutch-process cocoa, sieved
White Chocolate ricotta filling
240gm couverture white chocolate, finely chopped
600gm firm ricotta
Dark Chocolate ricotta filling
240gm dark chocolate (65% cocoa solids), finely chopped
600gm firm ricotta
20gm pure icing sugar, sieved
Method:
1) For chocolate sable pastry, preheat oven to 180C. Beat sugar, sour cream and 60gm butter in an electric mixer until very pale (2-3 minutes). Add flour and cocoa, stir to combine. Roll out pastry between two pieces of baking paper to a 20cm X 25cm rectangle. Place on an oven tray, bake until crisp (25-30 minutes), then cool. Break into coarse pieces, process in a food processor to fine crumbs. Melt remaining butter, add to food processor, process to combine. Press into a base of a 6cm deep, 22cm diameter ring mould placed on a tray lined with baking paper. Bake until firm (8-10 minutes), cool.
2) For white chocolate ricotta filling, place all ingredients in a heat proof bowl over a saucepan of simmering water. Stir until chocolate melts. Let cool to room temperature and spoon over crumb base, smooth top and refrigerate until firm (30 minutes).
3) For dark chocolate ricotta filling, observe same steps as white chocolate ricotta filling. Once mixture cools to room temperature, spoon them over the white chocolate filling. Smooth top and refrigerate until firm (30 minutes). Best kept overnight.
4) Meanwhile, place hazelnuts on an oiled oven tray. Combine sugar and 60ml water in a saucepan, stir over medium-high heat until sugar dissolves, cook until dark caramel (5-7 minutes). Pour caramel over hazelnuts, stand until set, break into coarse pieces and store in an airtight container until required.
5) Combine dark chocolate and cream in a heatproof bowl over a saucepan of simmering water, stir occasionally until smooth (3-4 minutes). Whisk yolks and 30ml water in a heatproof bowl over a saucepan of simmering water until light and fluffy (2-3 minutes), fold in chocolate mixture, transfer to an electric mixer, whisk until thick and cooled to room temperature (6-8 minutes). Spoon over cake, refrigerate until set (2-3 hours). Scatter with praline hazelnuts, dust with cocoa and serve.
(note: as mentioned earlier on, I discarded this step and instead pipe chocolate ganache on the set layer of the dark chocolate ricotta filling. If u happen to give this step a try, would like to know your outcome!)
Sunday, October 31, 2010
Stewed chicken and mushroom in wok "remains" of Momofuku style XO sauce!
Ingredients:
4 chicken drumstick
1 cup of sliced mushroom
A handful of Coriander, chopped
Method:
1) Heat up wok on medium high with remains of momofuku style XO sauce.
2) Saute chicken in the wok until slightly brown on both sides and chicken is coated with XO sauce remains.
3) Add mushrooms and again saute until it is well coated with XO sauce remains.
4) Reduce heat to low and cover wok with lid and let chicken and mushrooms to simmer for about 15 - 20 minutes. You should start seeing juices from chicken and mushrooms. Open lid and stir chicken and mushrooms.
5) Add about 1/2 cup water (more if its too dry for you), stir to incorporate. Cover lid with wok and let it simmer for another 20 minutes or until chicken is cooked and tender.
6) Add coriander and let it simmer for another 10 minutes. At this stage, you will have a finished product where chicken is tender and well coated with the sauce and there should not be much liquid remaining.
7) Serve warm on a bed of cooked rice and sprinkle some XO sauce on it - ENJOY!
Momofuku style XO Sauce - versatile on anything:)
A couple of months back, bought a copy of Momofuku recipe book by the famous Korean American chef David Chang and co written by peter meehan. Lots of the recipes are pretty interesting and not over complicating. One that I have longed to try for a very long time is the XO Sauce. However, living in Wagga Wagga, a couple of the ingredients was not easily available (they do sell XO sauce in a bottle but that does not help really lol) especially dried scallops and dried shrimp. Hence, on my recent trip home and to Sydney, I made sure I got those 2 ingredients.
For those unfamiliar with XO sauce, its a very concentrated sauce pack with lots of flavouful ingredients such as dried shrimp, dried scallops, ginger, garlic and some commercial brands out there do also sell Salmon XO sauce which I have not tried. It is very versatile on anything, a tablespoon on stir frys, fried rice, seafood etc makes a world of difference. It can be stored in a container and kept in the fridge for over a month.
Anyways, recipe as per below, do give it a try:)
(Adapted from MOMOFUKU recipe book by David Chang and Peter Meehan - modified slightly)
Ingredients:
1/2 cup dried scallops (Can be bought at asian dried seafood stored. It is rather pricey hence use them sparingly)
1/2 dried shrimp (Can be bought at asian grocery stores)
1/2 cup peeled garlic
1/2 cup peeled ginger, sliced
1 cup chopped country ham or chinese sausages (you can substititute with other ham type which I did if you can't find country ham)
1/2 cup grapeseed oil or other neutral oil
1 tablespoon crushed dried red chille
Method:
1) Place scallops and shrimp in a bowl, rinse them and soak them in water overnight covered.
2) Place garlic and ginger in a food processor, pulse on and off until finely chopped, place in a bowl.
3) Discard water from the soaked dried shrimp and scallops and place in food processor, again pulse on a off until it is finely chopped, placed in bowl.
4) Placed ham in food processor and mince till fine, placed in a separate bowl.
5) Heat oil on medium high heat in wok for 1 minute
6) Add ham into oil and fry till browned and crisp (around 5-10 mins)
7) Add dried chille and fry for another 2-3 minutes.
8) Turn heat down to very low and add rest of the ingredients. Let it simmer for about 45-55 minutes. Stir it a couple of times in between to ensure that ingredients does not stick on the base. It is ready when the garlic and ginger is dirty blonde in colour. Can be used immediately once ready or stored in a container and refrigerated for a month or more.
(p.s. After finishing this, the wok will have flavourful remains of the XO sauce. It would be such a waste to just wash them off, hence look out for next blog write up on Wok "remains"of XO sauce stewed chicken!)
Enjoy!
Wednesday, October 27, 2010
Daring Bakers Challenge Oct 2010 - Old Fashioned Buttermilk Cake Doughnuts with Chocolate and Flake Almonds topping!
The October 2010 Daring Bakers Challenge was hosted by Lori of Butter Me Up. Lori choose to challenge DBers to make doughnuts. She used several sources for her recipes including Alton Brown, Nancy Silverton, Kate Neumann and Epicurious.
My last posting before this was a month ago. How time flies! Have been very busy travelling the last couple of weeks including weekends. Was starting to get a little worried about not being able to complete this challenge. Furthermore, have not made a doughnut before and was pretty excited about this challenge. Finally had time last Sunday and first thing I did when I woke up was to get a start on this. I was pleasantly surprise that it did not take me long to do this. Was rather messy but all in all it took me about an hour and viola, I had warm doughnuts for brekkie on a beautiful Sunday morning:) There was several recipes attached for this challenge, but I decided to do the Old-Fashioned Buttermilk Cake Doughnuts, and instead of sprinkling the finished doughnuts with icing sugar, I decided to topped them with 2 of my favourite ingredients which was melted dark chocolate and almond flakes. Anyways, below is the recipe, enjoy:)
Old-Fashioned Buttermilk Cake Doughnuts:
Preparation time:
Hands on prep time - 25 minutes
Cooking time - 12 minutes
Yield: About 15 doughnuts & 15 doughnut holes, depending on size
Ingredients:
Sour Cream ¼ cup / 60 ml / 60 gm / 2 oz
All Purpose Flour 3 ¼ cup / 780 ml / 455 gm / 16 oz + extra for dusting surface
White Granulated Sugar ¾ cup / 180 ml / 170 gm / 6 oz
Baking Soda ½ teaspoon / 2.5 ml / 3 gm / .1 oz
Baking Powder 1 teaspoon / 5 ml / 6 gm / .2 oz
Kosher (Flaked) Salt 1 teaspoon / 5 ml / 6 gm / .2 oz (If using table salt, only use ½ teaspoon)
Nutmeg, grated 1.5 teaspoon / 7.5 ml / 9 gm / .3 oz
Active Dry Yeast 1 1/8 teaspoon / 5.6 ml / 3.5 gm / .125 oz
Buttermilk ¾ cup + 2 Tablespoon / 210 ml / 225 gm / 7 ¾ oz
Egg, Large 1
Egg Yolk, Large 2
Pure Vanilla Extract 1 Tablespoon / 15 ml
Powdered (Icing) Sugar ¼ cup / 120 ml / 65 gm / 2.3 oz (Used for decorating and is optional)
Directions:
1. In a small stainless-steel bowl set over a pot of gently simmering water, heat the sour cream until just warm.
2. Heat the oil to 375°F/190°C.
3. Over a large mixing bowl, sift together the flour, sugar, baking soda, baking powder, salt, nutmeg; make a large well in the center. Place the yeast in the well; pour the sour cream over it. Allow it to soften (if using packed fresh yeast), about 1 minute.
4. Pour the buttermilk, whole egg, egg yolks, and vanilla extract into the well. Using one hand, gradually draw in the dry ingredients. The mixture should be fairly smooth before you draw in more flour. Mix until it is completely incorporated. The dough will be very sticky. Wash and dry your hands and dust them with flour.
5. Sift an even layer of flour onto a work surface. Don’t be afraid to use a lot of flour. You don’t want the doughnuts sticking to your counter. Scrape dough out of bowl onto the surface; sift another layer of flour over dough. Working quickly, pat dough into an even 1/2-inch (12.5 mm) thickness. Dip cutter in flour and, cutting as closely together as possible, cut out the doughnuts and holes. Place holes and doughnuts on a floured surface. Working quickly, gather scraps of dough together, pat into 1/2-inch (12.5 mm) thickness, and cut out remaining doughnuts and holes.
6. Drop three to four doughnuts at a time into the hot oil. Once they turn golden brown, turn them and cook the other side. Cooking times may vary, but with my oil at 375 °F/190°C, I found they only took about 20 to 30 seconds per side.
7. Once cooked, place on a baking sheet covered with paper towels to drain.
8. Sift powdered sugar over doughnuts and serve.
Monday, September 27, 2010
Daring Bakers Challenge Sept 2010: Decorated Sugar Cookies (2 first!)
The September 2010 Daring Bakers' challenge was hosted by Mandy of "What the Fruitcake?!" Mandy challenged everyone to make Decorated Sugar Cookies based on recipes from Peggy Porschen and The Joy of Baking.
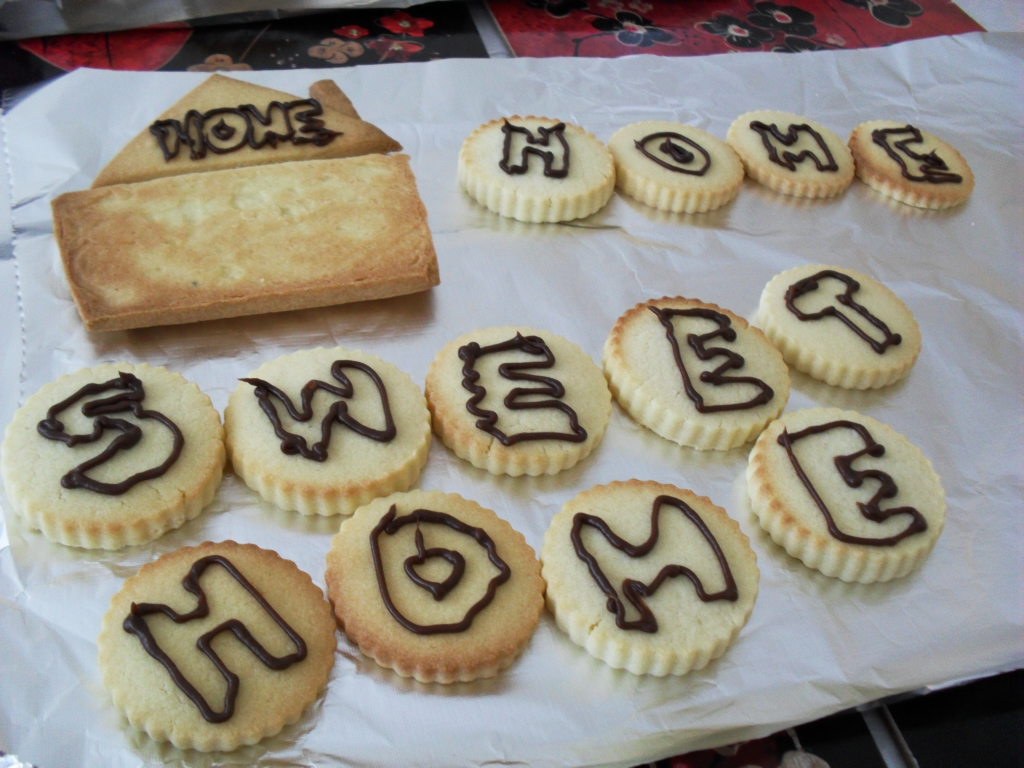
This challenge is a 2 first for me, 1st being my first daring bakers challenge and 2nd, its the first time am making decorated sugar cookies. September has been a rather hectic month at work and was definitely a challenge to spend time in the kitchen. However, September is also when I am schedule to go on vacation (after completing all the projects at work of course!) and am going back to Kuala Lumpur for vacation, yay yay!! Last time I was home was during Chinese New Year which was some 7 months back. Hence, the theme of my decorated sugar cookies is "home sweet home".
When I finally am able to set time aside to execute on this challenge, the outcome was a satisfying one. As always spending time in my kitchen has always allow me to dive into another world and just focus on my kitchen experiments.
This process is very interesting to me as when I first started out baking the basic sugar cookies, it had looked rather plain. After that I outlined the cookie with a store bought icing pen, chocolate flavoured, it was worst looking than plain. Lastly, after making the royal icing and piping them on to the cookies, it was definitely much much better looking than the first 2 processess although there is some opportunities for improvement in terms of neatness. The end result looks more like a picture to be hung up on the wall then sugar cookies...amazing. Definitely had fun making them:) Recipe as per below...enjoy:)
Basic Sugar Cookies:
Makes approximately 36 x 10cm / 4 inch cookies
200g / 7oz / ½ cup + 6 Tbsp Unsalted Butter, at room temperature
400g / 14oz / 3 cups + 3 Tbsp All Purpose / Plain Flour
200g / 7oz / 1 cup Caster Sugar / Superfine Sugar
1 Large Egg, lightly beaten
5ml / 1 tsp Vanilla Extract / Or seeds from 1 vanilla bean
Directions:
1) Cream together the butter, sugar and any flavourings you’re using. Beat until just becoming creamy in texture. Tip: Don’t over mix otherwise you’ll incorporate too much air and the cookies will spread during baking, losing their shape.
2) Beat in the egg until well combined, make sure to scrape down the sides of the bowl.
3) Add the sifted flour and mix on low until a non sticky dough forms. Tip: I don’t have a stand mixer so I find it easier to switch to dough hooks at this stage to avoid flour flying everywhere.
4) Knead into a ball and divide into 2 or 3 pieces.
5) Roll out each portion between parchment paper to a thickness of about 5mm/1/5 inch (0.2 inch)
6) Refrigerate for a minimum of 30mins. Tip: Recipes commonly just wrap the whole ball of dough in clingwrap and then refrigerate it for an hour or overnight, but by rolling the dough between parchment, this shortens the chilling time and then it’s also been rolled out while still soft making it easier and quicker.
7) Once chilled, peel off parchment and place dough on a lightly floured surface.
8) Cut out shapes with cookie cutters or a sharp knife.
9) Arrange shapes on parchment lined baking sheets and refrigerate for another 30mins to an hour. Tip: It’s very important you chill them again otherwise they’ll spread while baking.
10) Re-roll scraps and follow the above process until all scraps are used up.
11) Preheat oven to 180°C (160°C Fan Assisted) / 350°F / Gas Mark 4.
12) Bake until golden around the edges, about 8-15mins depending on the size of the cookies. Tip: Bake same sized cookies together otherwise mixing smaller with larger cookies could result in some cookies being baked before others are done.
Tip: Rotate baking sheets half way through baking if your oven bakes unevenly.
13) Leave to cool on cooling racks.
14) Once completely cooled, decorate as desired. Tip: If wrapped in tinfoil/cling wrap or kept in airtight containers in a cool place, un-decorated cookies can last up to a month.
Royal Icing:
315g – 375g / 11oz – 13oz / 2½ - 3 cups Icing / Confectioner’s / Powdered Sugar, unsifted
2 Large Egg Whites
10ml / 2 tsp Lemon Juice
5ml / 1 tsp Almond Extract, optional
Directions:
1) Beat egg whites with lemon juice until combined. Tip: It's important that the bowls/spoons/spatulas and beaters you use are thoroughly cleaned and grease free.
2) Sift the icing sugar to remove lumps and add it to the egg whites. Tip: I’ve listed 2 amounts of icing sugar, the lesser amount is good for a flooding consistency, and the larger amount is for outlining, but you can add even more for a much thicker consistency good for writing. If you add too much icing sugar or would like to make a thinner consistency, add very small amounts of water, a few drops at a time, until you reach the consistency you need.
3) Beat on low until combined and smooth.
4) Use immediately or keep in an airtight container. Tip: Royal Icing starts to harden as soon as it’s in contact with air so make sure to cover containers with plastic wrap while not in use.
Subscribe to:
Posts (Atom)